Products Entity
The products module is the central place where all products and products categories are managed.
Menu options
- Product - area where all the products are managed
- Product by Category - area where products can be viewed by category
- Categories - area where all the product categories are managed
- Configuration - Reserved for future use. Currently no product options exist.
The products module can be found on the menu under Transactions » Products.
Manage Products
The products area holds all the products that have been created on the system. Products are listed in the table and displaying the following information:
Code - Product code applied to the product
Name - Name of the product
Primary Category - Use this setting to define the primary category in the event the product has been assigned to multiple categories
Published - Use this setting to publish or unpublish products
Crated - Displaying date when the product was created
Edit product
Click the “edit pencil” icon to edit/view the product content or configuration.
Product Actions
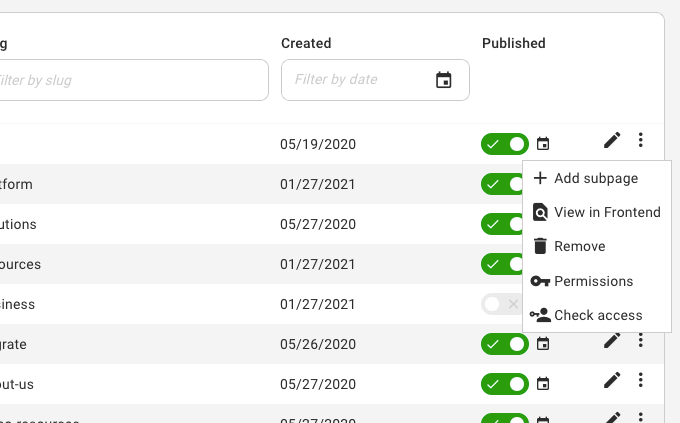
Click the “three dots” icon to view product actions:
+ variant - use this action to create a new product variant
View in Frontend - use this shortcut action to view the product on the website
Remove - use this action to remove the product from the system
Permissions - use this action to configure the permissions who can see the product
Check Access - use this action to check access permissions for each product
Product Details Page
To access the product details page on one of the existing products go to Transactions » Products and click on the “edit pencil” icon.
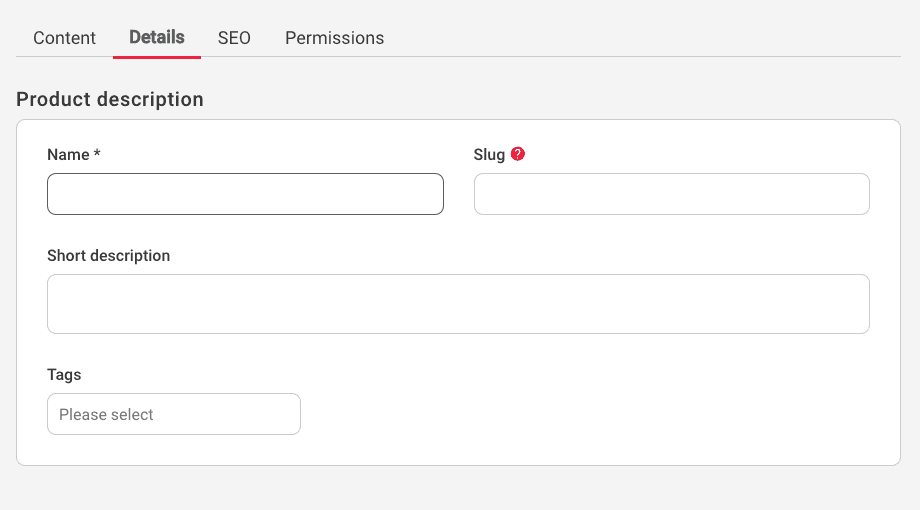
To create a new product click on the Add Product button on the top right corner of the admin, and that will open a blank product details page where the product can be configured:
The Product Details page holds the following configuration sections.
Product Description section:
Name - use this field to add a name to the product
Slug - use this field to define the product slug, or URL path the product will live on
Short description - use this field to add a short description to the product
Tags - use this selection field to assign tags to products. This can be then used for filtering and search, or displaying products by tag.
Product Details:
Code - use this field to define the Product Code
Primary Category - use this selection field to define the product primary category, in the event the product has been assigned to multiple categories
Category - use this selection field to assign the product to one or multiple categories
Thumbnail - use this image upload field to upload the main product image
Product Pricing - define your product prices in this area, such as Base Price, Special Price, Retail Price, Cost Price.
Product Dimensions - define your product size and weight for shipping calculations
Product Content:
In the product content area, it is possible to create different product layouts that can be applied to any product. For example, one layout can be a basic layout, another can be an extended layout utilising components etc. Based on the layout selection available options will change automatically:
Simple Layout
Extended Layout
SEO Settings
SEO section is used to introduce SEO properties to the product page. This feature enables the admin to do on-page search optimisation on any content they have on the website in order to get higher on Google search results. Some of the properties available to edit are:
SEO Title
Meta Description
Canonical URL
Share Image (for social media)
Robots Settings (Index & Follow, Index but don't Follow, Don't index but follow, Don’t index & don’t follow)
Meta Keywords
Alternate URLs
Visibility Options
Use the “Published” setting to determine the status of the product. It is also possible to define the date when the product should be published, or unpublished by using the “Available From” & “Available Until” date selection fields.
Permissions
By default the permissions are set to inherit from the parent, however that can be overridden and permissions can be configured for this product only. For more information on how to manage permissions click here.
Manage Categories
The product by category area is divided into two sections. The left section holds all the categories created on the shop, while the right section holds all the products created on the shop.
By default, when none of the category items are selected all the products will be listed in the right section However, if you select a category then only products from that specific category will be listed on the right side of the screen.
In the example below, classes category is selected and only three products are listed:
It is also possible to add products from the Product by Category admin screen by clicking on the "Add Product" button on the top right-hand corner.
Add New Category
To add a new category navigate to the Transactions > Categories page in the DXP. Click the “Add Category” button to create a new category:
When creating a new category there three main areas:
Category Details - add category name, slug & parent category
Permissions - set user/group permissions for this category
Visibility Settings - determine if the category should be published or unpublished
Category can also be added via “three dots” icon on the category listing area:
This can be used as a shortcut for creating subcategories directly from the admin, instead of configuring the same via the “Add Category” creator.

